Now that you’ve finished your transfer from HTTP to HTTPS, you deserve a quick break. Next up is your 10-step SEO Checklist to maintain your Google ranking! Take a breather, and when you’re ready come back because the work is not over! The next few steps are as critical as making the switch from HTTP to HTTPS and you want to be ready to tackle everything!
This 10-step condensed guide is what I wished I had when I was doing the switch – it would have made the process less daunting and easier to follow. These were the exact 10 steps I took when I migrated my site from http to https about a year ago. You can certainly go beyond 10 steps but I feel like this is the minimum to ensure all your materials are updated accordingly. Where possible, I’ve included pictures to make it easier for you! This SEO optimization checklist will cover everything from Google Analytics, Webmasters’ Tools and your blog’s internal settings.
If you find this tutorial (and the previous How to Switch Your Site from HTTP to HTTPS (No Coding Required)) tutorials useful, please consider using my affiliate links to support the blog!
Need some help or emotional support, or maybe someone to guide you through the process? Get in touch with me so I can either point you in the right direction!
Your 10-Step Action Plan to Transfer from HTTP to HTTPS
- Update your Blog Settings
- Use Better Search & Replace to Update ALL Your Links
- Force 301 Redirect via .htaccess file
- Update Google Analytics
- Update Google Search Console
- Verify Ownership on Google Search Console
- Resubmit Your XML Sitemap File to Google
- Confirm You’ve Done Everything Correctly
- Update All Your Social Media & Related Services
- Monitor Your Site & Stats
What You Need
This tutorial assumes that you are a self-hosted WordPress user, and that you use the free Yoast SEO plugin. You should also have access to cPanel.
- A self-hosted WordPress site
- Yoast SEO WordPress plugin (Free version will suffice)
- Better Search and Replace WordPress Plugin
- Access to Google Analytics and Search Console / Webmaster’s Tool
- (Optional) Access to
.htaccessfile
1. Update your Blog Settings
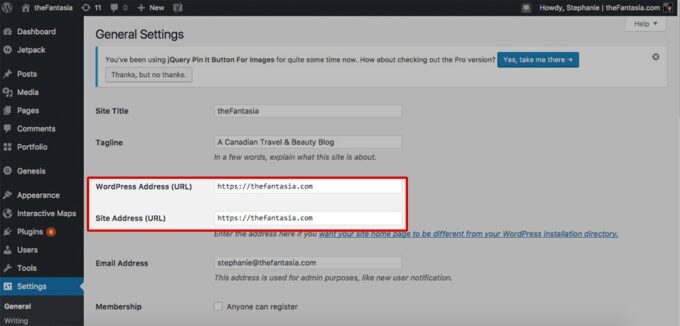
Go to your blog’s settings page and update all the homepage/relevant links. For Wordress users, go to Settings » General and replace http with https in the two fields as shown in the image below.
2. Use Better Search & Replace to Update ALL Your Links
You must create a backup of your database before doing this step. I promise if will save you the hassle and time if something goes wrong. Download the Better Search & Replace Plugin for WordPress, and install it. What you want to do next is done in two steps; remember, this change will impact your internal database, so TRY TO NOT MAKE A TYPO or any mistakes.
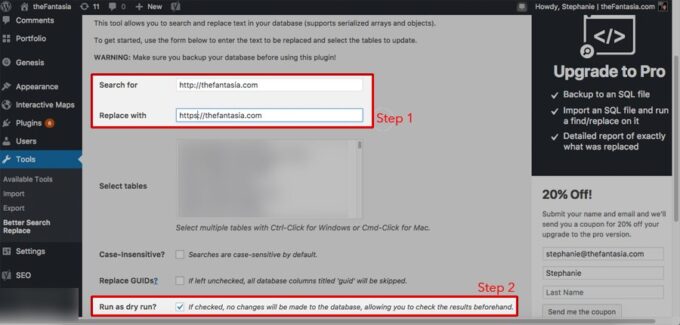
- Start by inputting your OLD FULL URL (http://thefantasia.com) in the “Search For” field, and enter your NEW FULL URL (https://thefantasia.com) in the “Replace For” field.
- Then run this process as a Dry Run (leave the box checked) as a test run. Go to your homepage, make sure your page is still accessible / working as before (i.e. it’s not showing a 500 Internal Server error). If nothing has changed and every link is working fine, that means you did it properly! Repeat Step 1, but uncheck the box when running it this time. This will update all the fields in your database to the new URL.
3. Force 301 Redirect via .htaccess file
In addition to updating your links, any old links that still has http in the worldwide web will be forced to go to the new site. This happens in the background and is super simple to do – even if you type in http://BLOGURL.com, as soon as the page loads, you’ll be taken to https://BLOGURL.com
To do this, go to cPanel » File Manager » public_html folder and find your .htaccess file. It might be a hidden file depending on your host or you might not have one. All WordPress users will have this file, so if you don’t see it, it’s because the file is hidden.
If you have “unhide” all your files, but can’t find the .htaccess file, you will need to create it. Create a file called .htaccess and don’t forget about the period at the beginning. Paste the below code.
RewriteEngine On
RewriteCond %{HTTPS} off
RewriteRule (.*) https://%{HTTP_HOST}%{REQUEST_URI} [R=301,L]
4. Update Google Analytics
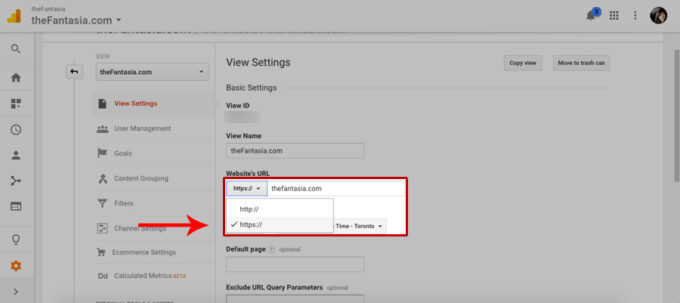
Go to your Google Analytics page. On the bottom left hand corner, go to Admin » View Settings which should take you to the page shown below.
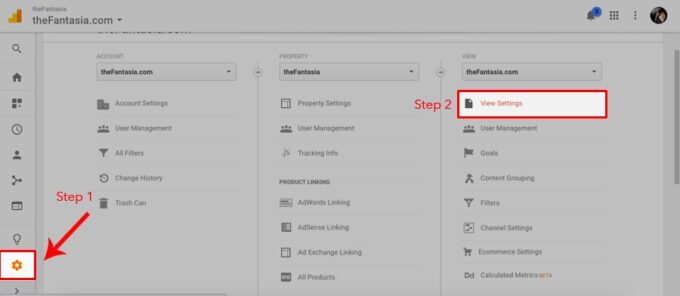
Then update your site protocol to https, and save.
5. Update Google Search Console
The next thing you have to do is update Google Search Console which is the new Google Webmaster’s Tool. Create an account for your blog if you haven’t already.
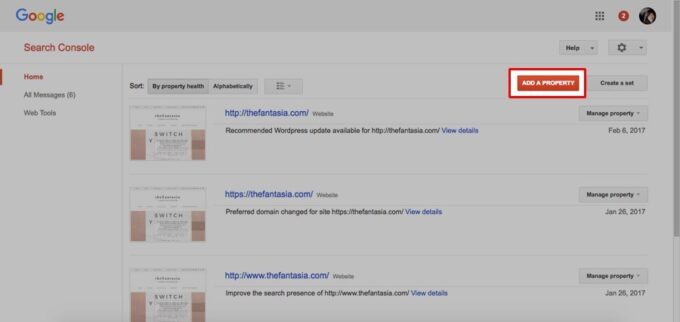
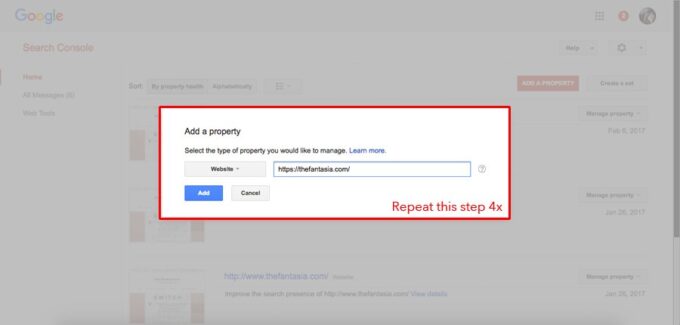
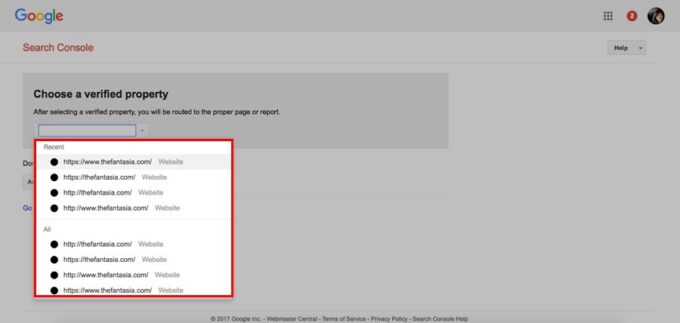
You need to click on Add a Property, and input your blog URL. You need to repeat this step 4x and include all of your blog URL variants so Google knows that you own all of the links (and don’t consider it a new URL). A minimum of 4 variants should be present and included in the Google Search Console.
6. Verify Ownership on Google Search Console
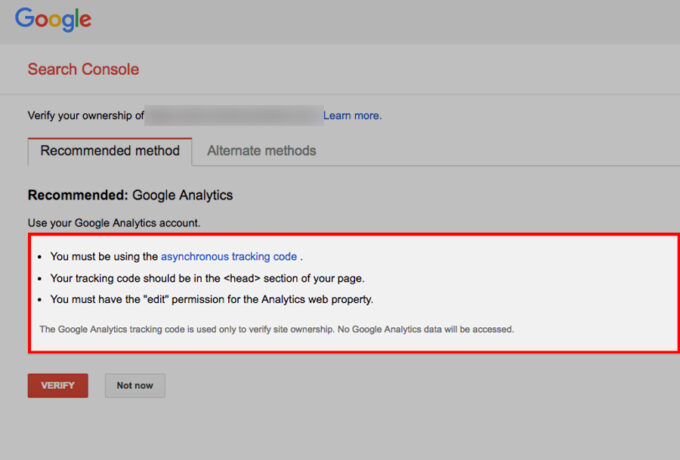
Once you finish the step above, Google will ask you to verify that you are the owner of the blog. You should be asked to dump a file in your html page (between the head tags).
7. Resubmit Your XML Sitemap File to Google
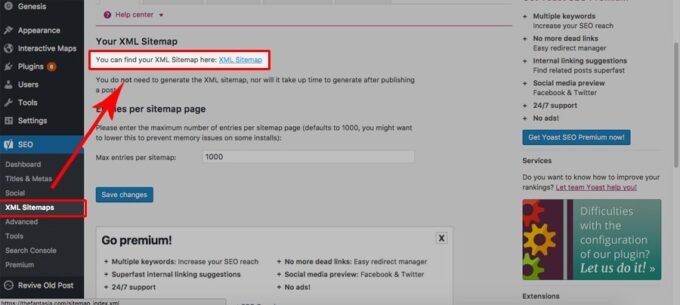
Go back to your WordPress blog. Download and install the Yoast SEO plugin if you haven’t already. If you already have it, to go SEO » XML Sitemaps and copy and paste xml sitemap URL from the link provided (it should be something like sitemap_index.xml or something similar). You need to copy this path to the Google Search Console.
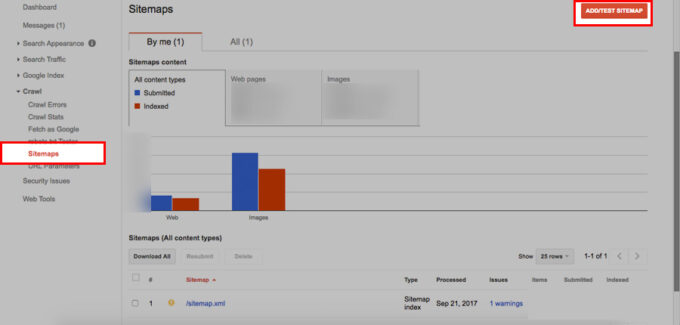
Go back to Google Search Console; go to Crawl » Sitemaps » Add/Test Sitemap. Your page will look different than mine as I have obviously added my sitemap a long time ago. A mini drop-down menu will appear, paste sitemap_index.xml into the box and save. Repeat this process for Bing’s Webmaster Tool (optional).
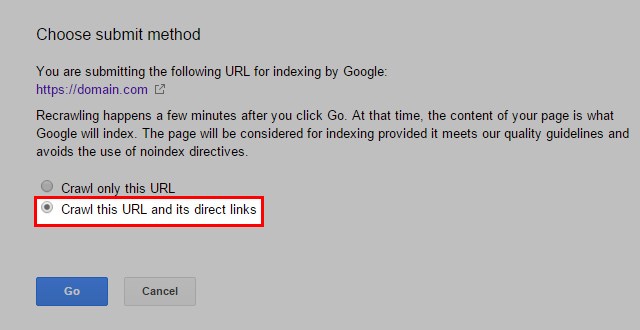
Let Google run its bots through your entire site by checking off the second bullet as indicated.
8. Confirm You’ve Done Everything Correctly
Google has a nifty tool that lets you check how Google renders your site and this is a great tool to check whether you’ve done all the previous steps correctly. The tool is called Fetch as Google (it is part of the Search Console and can be found under Crawl » Fetch as Google – super descriptive names I know). Run all four URL variants and make sure you’re getting a nice green check box at the end.

The hard part is done at this point! The next few steps are fairly easy!
9. Update All Your Social Media & Related Services
Don’t forget to update all your social media profiles. If your site is connected to Disqus, CommentLuv, IFTTT, MailChimp or any other external services, make sure everything is updated accordingly. It doesn’t make too much of a difference, but some scripts like CommentLuv can be super-sensitive to https links.
10. Monitor Your Site & Stats
Over the next few days you should start noticing that your URL bar is showing “Secure” and a https link is attached to your URL. Congratulations! You’ve completed one of the most challenging blogger task! You should thoroughly comb your site for any errors and track your stats – if you’ve done everything correctly, your stats should remain consistent and there shouldn’t be any blips/downturn.
Summary & Helpful Readings
As you can see this process is fairly extensive and require focus and dedication to complete. Once completed, you can rest easy knowing that your site follows Google’s guidelines for SEO best practices. If you find this tutorial and the previous one helpful, consider using my affiliate links to support the blog further – thank you!

