Blush application techniques can be one of the most daunting techniques to master. Do it wrong, and it is a sure-fire way to announce to the world that you could use a little help in that department. Even as someone who wears makeup everyday, blushes can still be tricky for me to apply, especially when I switch out the formula and colours. Knowing and mastering the right technique to apply blush can make a huge difference to your complexion, and make you the master of all-things blush in that regards.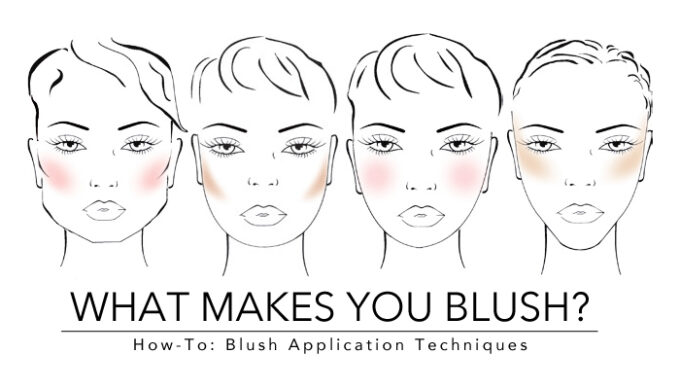
A couple of months ago, I had the pleasure of attending an event hosted by Make Up For Ever to celebrate the launch of the new HD Cream Blushes. We had the opportunity to work with one of the makeup artists who showed us various blush application techniques, depending on the result you want to achieve and your face shape. Make Up For Ever Canada graciously shared their how-to guide here which hopefully can help you master those blush application techniques!
Blush Application Techniques
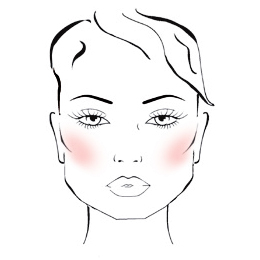
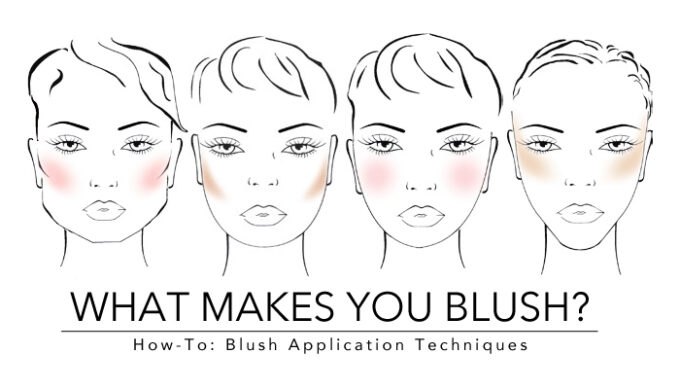
Classic – All Face Shape
Pro Tip: Apply the blush on the cheekbone. Begin at the hairline, and blend inwards to the apple of the cheek. Apply HD Blush with movements in the shape of an “8”.
When it comes to blush application, this is probably the most common technique that most of us are familiar with. I highly recommend applying the product on the higher planes of the cheek rather than lower, as applying the blush too low can drag the face down and can look unnatural.
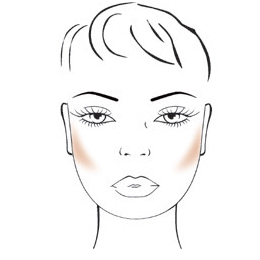
Sculpting – Round and Square Shapes
Pro Tip: Begin application at the hairline (at the middle of the ear) and blend towards the mouth to sculpt the cheek. Look straight forward being mindful not to apply too close to the nose. Then, blend upwards to emphasize the size of the cheekbone.
I’m a fan sculpting the face as it can alter the shape of your face naturally. My favourite type of formula to use is a cream-based formula as it is very forgiving and easier to work with!
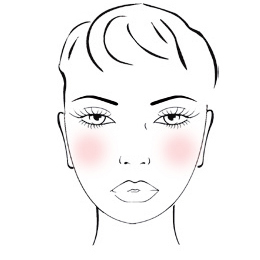
Healthy Glow – Oval
Pro Tip: Apply HD Blush to the apple of the cheek in circular motions.
If you have an oval-shaped face, you’re in luck! Not only do you look flattering with every technique possible, but application on this face shape is the hardest to get wrong. Applying the product directly on the apple of the cheeks will give you a natural glow – but be careful with the application! Too low and it will drag your face down, and too high, it will look completely unnatural.
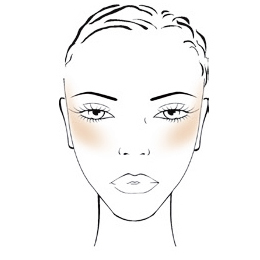
Highlighting – Heart shaped
Pro Tip: Apply HD Blush to the upper cheekbone, and the careful not to apply it on the area underneath the eyes. Then blend towards the temples (can also be stretched across the brow bone).
This face shape can get away with applying the product directly on the upper cheekbone to emphasize the bone structure. The idea is to draw the eyes to the most prominent area on the face and create balance on this particular shape.
Did you find this how-to post useful? Which technique were you must surprised to learn about? Will you be changing your blush application technique? As always, I’d love to hear your thoughts! Share with me comment section or through Twitter or Instagram!
I have been so surprised at how “poorly I’ve been applying my blushes (and no one told me too!) I’m definitely learning and playing around a lot with these techniques ????
Blush is such a mystery to me. I can never seem to get it just right or even. This helps me!
Jessica
You’re welcome ???? Glad you found it helpful – thanks to Make Up For Ever for the awesome visuals as well!
Such a great and helpful post! I will definitely try the oval healthy glow. I used to apply my blush like that years ago but started to do it the classic way. Maybe it’s time for something new – or better to say old?
Thanks for the inspiration ????
xx Carolin
Olive Apple
You’re welcome ???? Glad you found it helpful too – really appreciated having Make Up For Ever share the visuals as well!
I usually just do it the classic way. I put more emphasis on the cheekbones rather than one the cheeks.
Same here! I prefer classic for the no make up look and sculpting for more serious cheekbone poppin’
This was a really interesting post, thank you!

I just tried a different blush placement today and I was amazed to see the difference, which inspired me to do a post about it, too!
I’ve always used the first method (classic), but I did the oval one today with a shade that I’d normally feel makes me look older, and the whole look was quite youthful!
I will definitely try other placements as well. Thanks for sharing. ????